Overview
For the upcoming round of LearnR at work I plan to make - finally - use of Xaringan slides.
Xaringan is based on the remark.js and produces html5-slides.
Preparation
As usual … install the package from CRAN
install.packages("xaringan")or make use of the development version from github:
## only install devtools if needed ##
#install.packages(devtools)
devtools::install_github('yihui/xaringan')
Kick-off a presentation
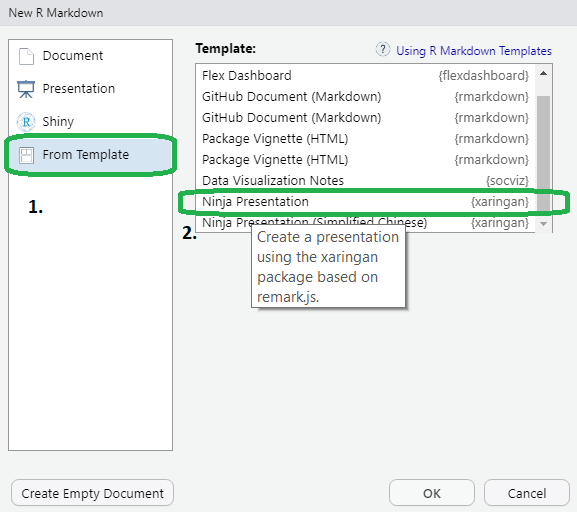
To create a xaringan presentation, you create an R Markdown document with the xaringan::moon_reader output format. From within RStudio, it is easy to get started. First click on the New File icon below File and then on R Markdown.

open xaringan from template submenu
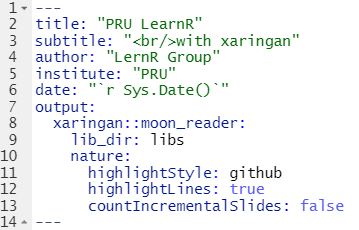
Complete the YAML header with title, author information, and date.
The annoying seal of the template slides is a symbol character of the sub-title (i.e. before the html tag for the linebreak
). It can be removed deleting or overwriting the subtitle.
Adding seal: false option to the YAML output: xaringan::moon_reader: section ignores the YAML information. A title slide can then be generated by hand.
Then save your presentation - Rmd file.

initial YAML for slideshow
It is worth to click through the template xaringan slideshow. It gives an overview of the syntax. At the time of writing this was done on 39 slides.
Slide styling
Xaringan is about html slides. Thus, the styling can be done by css. A nicer built-in theme is metropolis.
You can add a css tag to your YAML:
css: [default, metropolis, metropolis-fonts]This will load the required css. Of course you can develop your own css classes and/or themes for xaringan.
Slide Ratio
The slide ratio can also be set in the YAML:
...
output:
  xaringan::moon_reader:
    ...
    nature:
      ...
      ratio: 16:9
Slide Numbering
There exists a set of different slide number formats:
nature:
      # Examples
      slideNumberFormat: "%current%"                  # 12
      slideNumberFormat: "Slide %current% of %total%" # Slide 12 of 42
      slideNumberFormat: "%current%/%total%"           # 12/42
Slide basics
- use
---(3 hyphen to start/separate slides). The first slide will start after the ending hyphens of the YAML. - headings follow the Rmarkdown notation, i.e.
#for heading level 1,##for level 2, and###for 3rd level headings.
Two Column layout
50-50 - Two Evenly Spaced Columns
This is done by wrapping the content of the left column into .pull-left[...] and the right-column content into .pull-right[ ...].
.pull-left[

  Here comes my awesome left-column content.
]
.pull-right[

  And this is what shows up on the right hand side of the slide!

]
20-80 - Small side column and larger content colum
The predefined classes are .left-colum[] and .right-column[]. For example:
.left-column[
  Just a left column that has limited width, i.e. about 20%.
]
.right-column[
The awesome main column taking up about 75% of slide width!
]
Incremental slides
Incremental slides can be built by separating the on-click elements with 2 hyphens, i.e. --.
Further cool stuff
- using math/LATEX
- including DT, leaflet, plotly, etc.
- highlighing code
Advanced Code and Plot Classes
Implement Garden Buik stuff here.
Conclusions
As usual practice makes perfect. Thus, establishing slides and mastering the underlying syntax and shorthands is a question of applying it, again, and again, and again …
What struck me is that putting my first slide set together was done with a minimum of read up. Basically by putting my key lessons learned here.
If this was useful to you, I am glad that you found what you were looking for. If not let me know what could be added or done better.